Replacing an ignition coil can seem like a direct fix for a misfire, yet rough running often returns. The same code may be caused by a worn spark plug, damaged wiring, an injector problem, a vacuum leak, low compression, or unstable system voltage. A coil that appears healthy at idle can also break down when cylinder pressure and ignition demand rise during acceleration.
A quick spark or resistance check can provide useful clues, but neither proves reliable operation under every condition. A sound diagnosis combines the engine-specific service manual, OBD-II misfire data, visual inspection, power and ground checks, and, where appropriate, a cylinder swap test or oscilloscope analysis. That sequence takes longer than replacing parts at random, but it provides evidence for the repair.
- What a Failing Ignition Coil Actually Looks Like
- Prepare Safely Before Testing an Ignition Coil
- A Factory-Aligned Ignition Coil Diagnostic Workflow
- Ignition Coil Tests: What Each Method Can Prove
- Use a Cylinder Swap Test to Confirm the Suspect Coil
- Why Replacing a Coil Does Not Always Fix the Misfire
- Choose and Install the Replacement Coil Correctly
- Frequently Asked Questions
- How do you test an ignition coil to see if it is good or bad?
- What is a common symptom of a failing ignition coil?
- How long should an ignition coil last?
What a Failing Ignition Coil Actually Looks Like
A failing coil commonly causes rough running, hesitation, loss of power, or a flashing or steady check-engine light. The engine may idle unevenly, stumble during acceleration, or develop a misfire at high rpm. Some faults appear only after the coil has heated up, so the vehicle may start and run normally when cold.
Load-dependent failure is particularly misleading. As cylinder pressure increases during a hill climb or hard acceleration, the ignition system needs more voltage to bridge the spark plug gap. A partial insulation breakdown may therefore remain invisible at idle and appear only under load.
These symptoms do not identify the coil by themselves. Spark plugs, ignition wiring, injectors, fuel delivery, vacuum leaks, and compression problems can produce much the same behavior. Oil or moisture around a plug well can also create an external path for the spark, making a good coil appear defective.
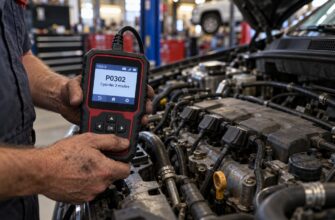
Use an OBD-II scanner to identify the affected cylinder and observe the misfire pattern. A code that remains on one cylinder calls for a broader cylinder-specific inspection; a pattern that changes between cylinders may point to a component or wiring problem. Record the original data before disturbing the ignition system.
Prepare Safely Before Testing an Ignition Coil

Ignition coils can generate approximately 20–40 kV, depending on coil design and operating conditions. Disconnect the battery or follow the vehicle’s specified shutdown procedure before removing connectors, and keep hands, tools, and loose clothing away from the ignition system during cranking or running tests. Use insulated equipment designed for the procedure rather than improvised leads.
Direct high-voltage spark testing is not universally acceptable. Some factory manuals prohibit testing a coil directly from a high-voltage lead because an open or incorrectly loaded circuit can damage insulation or the engine control system, while the exposed voltage presents a shock hazard. Forum shortcuts may work on some older systems, but the service manual takes priority.
A loose spark plug or a disconnected plug during cranking can create an unsafe and potentially damaging test condition. If the manual allows a controlled spark-gap check, use the specified tester and connection method. Do not assume that a test suitable for a conventional distributor system is safe for a modern coil-on-plug system.
Begin with the engine switched off and inspect the coil, connector, boot, and surrounding area. Look for cracks, swelling, corrosion, damaged terminals, oil, moisture, and dirt. White or blue tracks on the plastic or boot can indicate corona or surface arcing. Clean contamination and correct its source before interpreting electrical measurements.
A Factory-Aligned Ignition Coil Diagnostic Workflow
Start with a visual inspection, then scan the vehicle for diagnostic trouble codes and live misfire data. Note the affected cylinder, engine temperature, rpm, and load when the fault occurs. Freeze-frame information can show whether the misfire appears during starting, idle, acceleration, or sustained high load.
Next, verify the coil’s power supply and ground according to the engine-specific wiring diagram. A connector can look clean while having a loose terminal, damaged conductor, or voltage drop under load. Check the battery and charging system as well, because unstable system voltage can cause unstable coil operation and imitate a component failure.
Resistance testing is useful only when performed at the correct terminals and with the exact specification from the service manual. The primary resistance of many coils is approximately 0.3–3 ohms, while secondary resistance is commonly about 5–15 kilohms. These are general ranges, not universal pass-or-fail limits; some coil designs require a different test method entirely.
Use a meter with the appropriate low-resistance range and account for test-lead resistance when measuring a low-ohm primary circuit. Do not use a simple continuity beeper as a substitute for a specified measurement. An apparently normal reading does not rule out inter-winding shorts, insulation leakage, or a fault that occurs only with heat, vibration, or high voltage.
Oscilloscope analysis becomes valuable when the basic checks do not explain the misfire. A suitable waveform can show charging time, current rise, firing voltage, and burn characteristics, helping distinguish a coil problem from a plug, wiring, or control issue. Diagnostic benches can provide similar evidence when vehicle access or test conditions make an in-car measurement impractical.
Ignition Coil Tests: What Each Method Can Prove
No single quick test proves coil health under every operating condition. Each method answers a different question, so the strongest diagnosis comes from matching the test to the fault pattern and the vehicle’s factory procedure.
| Test method | What it can show | What it can miss | Main caution |
|---|---|---|---|
| Visual inspection | Cracks, oil, moisture, corrosion, damaged connectors, and white or blue corona tracks. | Internal electrical faults with no visible damage. | Switch the ignition off before handling the coil or connector. |
| Resistance measurement | An open circuit or a reading clearly outside the engine-specific specification. | Inter-winding shorts, insulation leakage, and faults that occur only under load. | Measure the correct terminals and range; general resistance values are not universal limits. |
| Controlled spark-gap check | A rough indication that the coil can produce a spark across a 1.0–1.1 mm gap, where the manual permits the test. | Breakdown under cylinder pressure, heat, or acceleration. | Some factory manuals prohibit direct high-voltage testing because of shock, insulation, or ECU risks. |
| OBD-II scan data | The affected cylinder, misfire frequency, operating conditions, and whether the pattern changes. | The exact component causing the misfire. | Use the data with cylinder-specific tests rather than treating a code as proof of coil failure. |
| Cylinder swap test | Whether the misfire follows the coil to another cylinder. | Intermittent faults that do not occur during the observation period. | Label connectors and reinstall each coil correctly; inspect wiring during the swap. |
| Oscilloscope analysis | Charging and firing behavior under actual operating conditions, including some faults missed by an ohmmeter. | Problems outside the ignition circuit, unless the waveform is interpreted with other data. | Use the correct probes and connection points specified for the system. |
Use a Cylinder Swap Test to Confirm the Suspect Coil

A cylinder swap test is one of the most useful practical checks for a coil-on-plug system. First, record the original misfire code and operating conditions. With the ignition off, move the suspected coil to another cylinder that uses the same type of component, label the connectors, and reinstall every coil fully on its plug.
Clear the codes only if appropriate for the vehicle and test plan, or record new scan results without clearing them. Run the engine under the conditions that produced the original fault, then compare the misfire location. If the misfire moves with the coil, the coil is a likely cause.
Record the original misfire pattern before swapping coils. A fault that follows the coil is stronger practical evidence than a normal static resistance reading because it shows how the component behaves in the vehicle.
If the misfire remains on the original cylinder, investigate the spark plug, injector, wiring, air leaks, and compression. A coil that passes between cylinders may still have an intermittent load-related fault, so repeat the test under the relevant conditions when necessary. Do not condemn the coil solely because the first swap produces no immediate change.
Connector errors can create a new misfire on another cylinder and confuse the result. Check terminal locks, harness routing, and coil seating before interpreting new codes. A damaged connector or stretched wire should be repaired before considering another parts replacement.
Why Replacing a Coil Does Not Always Fix the Misfire
Incorrect spark plug gap increases the voltage demand placed on the ignition system, while a poor engine ground can interfere with the return path and increase electrical stress. Worn plugs may also require more firing voltage than the coil can reliably provide under load. Check plug condition and gap against the engine-specific specification before blaming a replacement coil.
Oil, dirt, or moisture around the coil boot and plug well can promote surface arcing. The spark may travel along the outside of the insulator instead of across the plug gap, leaving carbon tracks and causing a recurring misfire. Clean the seating area, repair leaks, and inspect the boot and seal before installing another coil.
Fuel delivery faults, injector problems, vacuum leaks, and low compression can all create a cylinder misfire that remains after the coil is replaced. A scanner may identify the cylinder, but it cannot by itself distinguish an ignition fault from a mechanical or fueling fault. Testing the plug, injector control, air supply, and compression is often necessary.
Low battery voltage or an unstable charging system can cause inconsistent coil operation. Check system voltage during starting and with the engine running, following the vehicle’s specifications. A new coil may appear to fail if the electrical supply is unstable.
Replacing coils one at a time without confirming the cause can lead to repeated expense and changing fault codes. A repair is more convincing when the original misfire is documented, the suspected component is tested, and the result is verified with a follow-up scan and road test.
Choose and Install the Replacement Coil Correctly

Choose a coil listed for the exact engine, ignition architecture, and connector arrangement. A physical fit does not prove electrical compatibility. Coil inductance, current demand, pulse shape, thermal durability, and control-system compatibility all matter, and universal-fit claims do not guarantee that these characteristics match the vehicle.
Verified OE-quality parts are generally a safer choice than loosely specified low-cost replacements. Cheap aftermarket coils may use thinner insulation or simpler construction and may tolerate heat, vibration, moisture, and road salt poorly. A so-called high-output coil also does not automatically increase power or fuel economy on a correctly functioning standard engine.
Inspect the replacement boot, spring, connector, and seal before installation. Clean the coil seat and plug well, remove oil or moisture, and correct any leak that could contaminate the boot. The boot and its seal around the spark plug form an important part of the high-voltage insulation path.
Install the coil fully, secure the connector until its lock engages, and route the harness as specified. Do not force a connector or interchange similar-looking coils without confirming the application. After installation, scan for codes, verify that the original misfire has stopped, and check for new misfires on other cylinders.
Manufacturers generally recommend replacing a coil after a confirmed failure rather than replacing all coils preventively by mileage, unless the manufacturer specifies otherwise. If several coils show related damage from oil, moisture, poor voltage, or excessive ignition demand, repair that underlying condition before deciding whether additional replacement is justified.
Frequently Asked Questions
How do you test an ignition coil to see if it is good or bad?
Use a resistance check when the suspected fault is static and the service manual provides terminal-specific specifications. Use a cylinder swap test when the vehicle has a repeatable misfire on one cylinder; if the misfire moves with the coil, the coil is a likely cause. Use oscilloscope testing when the fault is intermittent or load-dependent because an ohmmeter may miss insulation leakage and inter-winding faults.
What is a common symptom of a failing ignition coil?
A common symptom is a misfire that appears during acceleration, high rpm, or hill climbing while the engine seems acceptable at idle. The higher cylinder pressure increases the voltage demand, allowing a partial breakdown to appear only under load. The same symptom can result from a plug, fuel, wiring, air, or compression problem, so scan data and a cylinder-specific test are still needed.
How long should an ignition coil last?
There is no universal replacement mileage that overrides the vehicle manufacturer’s diagnostic procedure. Service life depends on heat, vibration, moisture, plug condition, system voltage, engine grounding, and the coil’s construction. Replace a coil when its fault is confirmed or when the manufacturer specifies a different policy, rather than replacing all coils solely by mileage.